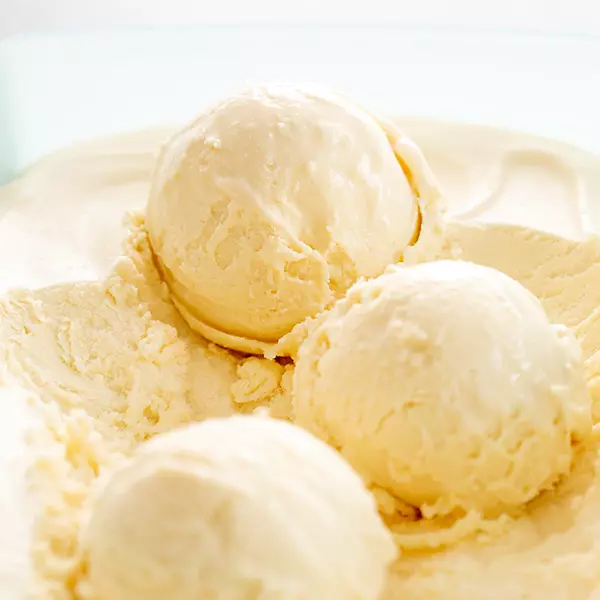
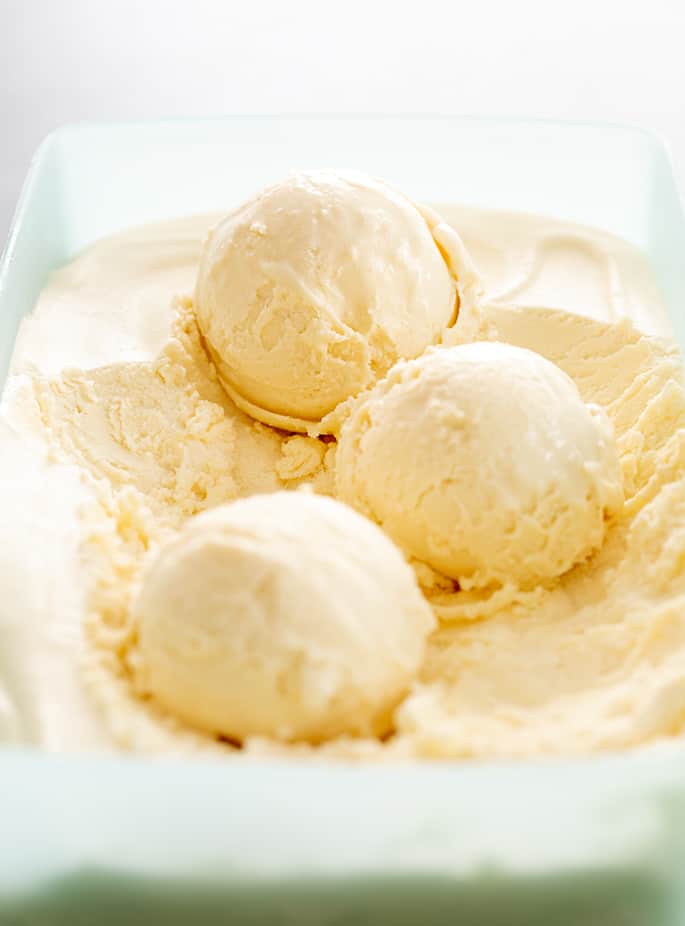
This no churn vanilla ice cream is the richest and creamiest ice cream of your life, and it’s made with only 3 simple ingredients. No ice cream machine needed!

This 3 ingredient vanilla ice cream is the richest and creamiest ice cream of your life. No fancy ingredients or ice cream machine needed! Summer, here we come!

Why not use an ice cream machine?
I have a couple ice cream makers, believe it or not. One is very old and cost me about $50—but still works. It’s the type that requires you to keep the bowl frozen. I rarely use it.
The other ice cream machine is a fancy compression ice cream machine that I thought for sure I would use all the time. You don’t have to freeze anything, and it does make beautiful ice cream out of almost anything—but it’s expensive and takes up a lot of counter space.
In fact, whenever I read a recipe that calls for an ice cream machine (you know – “churn according to manufacturer instructions”), my heart sinks, and I turn the page. It doesn’t seem like much of a recipe since nearly anything will have the consistency of ice cream if you put it in a machine and churn it.
The ice cream machines that utilize a frozen bowl also just don’t make very much ice cream, and they always freeze the ice cream unevenly, leaving you with a layer of ice cream that’s frozen solid around the perimeter of the machine. And since the inside is non-stick, the only way to get that ice cream out is to melt it. And then it’s not ice cream anymore!

Why does this gluten free ice cream recipe work?
There is a good reason that this method works and makes smooth and creamy ice cream without any fuss at all. And without any of the iciness that you can expect from other methods like the ones that tell you to mix and freeze the mixture, then stir it every hour or something.
Those no churn ice cream methods are great if you’re looking for a bunch of ice crystals and no smooth, creamy mouthfeel. If it’s not smooth and creamy, it’s just not ice cream to me.
In this recipe, the ingredients have a very low moisture content. If you substitute any of these simple ingredients, I can’t promise you’ll get a good result. Simple recipes like this are really best made as is, if at all possible.
Is ice cream gluten free?
Most ice cream is gluten free, but you have to watch out for mix-ins, cross-contamination and other conditions that might lead to its being unsafe on a gluten free diet.
Now I have always loved the melty ice cream that ends up on the bottom of the bowl. That is what you have, basically, before you place it in the freezer for the first time.
If you’d like to try making ice cream without cream, you’ll need a different recipe. Click through to find my recipe for making ice cream with milk only.

The secret to rich, creamy ice cream (with no ice cream maker!)
Friends, I’ve cracked the code on how to make the richest, creamiest ice cream you’ve ever tasted. Really. Let me share my secrets with you.
The importance of low moisture content
I can’t emphasize enough how crucial low moisture content is for achieving smooth, velvety ice cream. It’s what helps us avoid those dreaded ice crystals that ruin the texture. By choosing ingredients with low moisture content, we ensure that our ice cream stays creamy and soft.
Why folding the ingredients is essential
You might be tempted to just mix everything together, but trust me, folding the ingredients is key. This gentle method of combining the whipped cream with the sweetened condensed milk and vanilla preserves the airiness of the whipped cream. That’s what gives our no-churn vanilla ice cream that luscious, melt-in-your-mouth texture that you’ll love.
Tips for serving and storing homemade ice cream
No one likes a soupy ice cream mess. Here are some tips for keeping your homemade ice cream in tip-top shape.
Best containers for freezing this vanilla ice cream
When it comes to freezing ice cream, I recommend using a 2-quart freezer-safe container with a tight-fitting lid. This helps keep any unwanted odors out and prevents freezer burn. Plus, it’s the perfect size for our no-churn ice cream recipe!
How to keep your ice cream from melting too fast
To prevent your ice cream from melting too quickly, be sure to serve it right from the freezer. Our no-churn ice cream is scoopable straight from the freezer, so no need to let it thaw.
Customizing your no-churn ice cream
One of the best things about homemade ice cream is how easy it is to customize. Let’s have some fun!
Serve it in an ice cream cone
I have a recipe for ice cream cones, which are something of a labor of love. It also seems to be getting easier and easier to buy prepared gluten free ice cream cones.
But as the ice cream containers in the grocery store get smaller and smaller, and their ingredient lists get longer and longer, I find myself more interested than ever in making homemade ice cream.
Flavor variations for your vanilla ice cream base
Though our vanilla ice cream is simply divine, you can easily mix it up with different flavors. Try adding cocoa powder for chocolate, or a dash of peppermint extract for a refreshing twist.
Or mint extract and plenty of mini chocolate chips for mint chocolate chip. Fresh strawberries or strawberry sauce, caramel sauce, or chocolate chunks are all definitely delicious options. The possibilities are endless!
More mix-ins and toppings for a fun twist
Get creative with mix-ins and toppings! Swirl in some fruit preserves, chocolate chips, or crushed gluten free cookies. Top your scoops with sprinkles, hot fudge, or a dollop of whipped cream.

Troubleshooting your homemade ice cream
If you follow my recipe exactly, you shouldn’t have any problems. But, if you do encounter a bump in the rocky road (see what I did there?!), I’ve got a solution. Check it out…
Simple solutions for common ice cream consistency problems
If your ice cream turns out too hard, try adding a bit more sweetened condensed milk next time.
If it’s too soft, whip the cream a little longer before folding in the other ingredients.
How to avoid ice crystals in your no-churn ice cream
To keep those pesky ice crystals at bay, make sure you’re using ingredients with low moisture content, and always store your ice cream in a tightly sealed container.

Comparing no-churn and traditional ice cream
You might be wondering how no-churn ice cream stacks up against the traditional kind. Let’s take a closer look.
Texture and flavor differences
No-churn ice cream is just as rich and creamy as its traditional counterpart. In fact, some might argue it’s even creamier! The flavor of no-churn ice cream is spot-on, making it a fantastic alternative to churned ice cream.
Time and effort comparison
Traditional ice cream requires more time, equipment, and effort. With no-churn ice cream, all you need are a few simple ingredients and a little bit of patience while it freezes. No ice cream machine, no fuss. So you can whip up a batch of gluten free homemade ice cream whenever the craving strikes, without any hassle.
So there you have it, my dear gluten free friends! Now you know the ins and outs of making the most delicious, velvety no-churn ice cream. Don’t forget to experiment with flavors, mix-ins, and toppings. The sky’s the limit! Enjoy your homemade ice cream adventures, and stay cool this summer.
P.S. Did you say you needed a dairy free version? Try my dairy free no churn ice cream. You’ll love it!


No Churn Ice Cream | 3 Ingredients
This no churn vanilla ice cream is the richest and creamiest ice cream of your life, and it’s made with only 3 simple ingredients. No ice cream machine needed!
Yield: 2 quarts ice cream
Prevent your screen from going dark
Ingredients
- 1 pint (16 fluid ounces) heavy whipping cream chilled
- 14 ounces sweetened condensed milk (homemade or store bought)
- 2 teaspoons pure vanilla extract
Instructions
-
Place the cream in the bowl of a stand mixer fitted with the whisk attachment (or a large bowl with a handheld mixer) and beat the cream on medium, then medium-high speed until stiff peaks form.
-
Pour the sweetened condensed milk and the vanilla into the bowl of whipped cream, and fold the whipped cream in until only a few bright white streaks remain.
-
Pour the mixture into a 2-quart freezer-safe container with a lid, and smooth the top.
-
Cover tightly and place in the freezer until firm (at least 4 hours).
-
Serve right from the freezer. It will not need to thaw at all to be scoopable.
Notes
Nutrition information is approximate per quart of ice cream and should not be relied upon.
Nutrition
Calories: 1453kcal | Carbohydrates: 115g | Protein: 22g | Fat: 103g | Saturated Fat: 65g | Polyunsaturated Fat: 4g | Monounsaturated Fat: 26g | Cholesterol: 335mg | Sodium: 316mg | Potassium: 967mg | Sugar: 115g | Vitamin A: 4008IU | Vitamin C: 7mg | Calcium: 720mg | Iron: 1mg