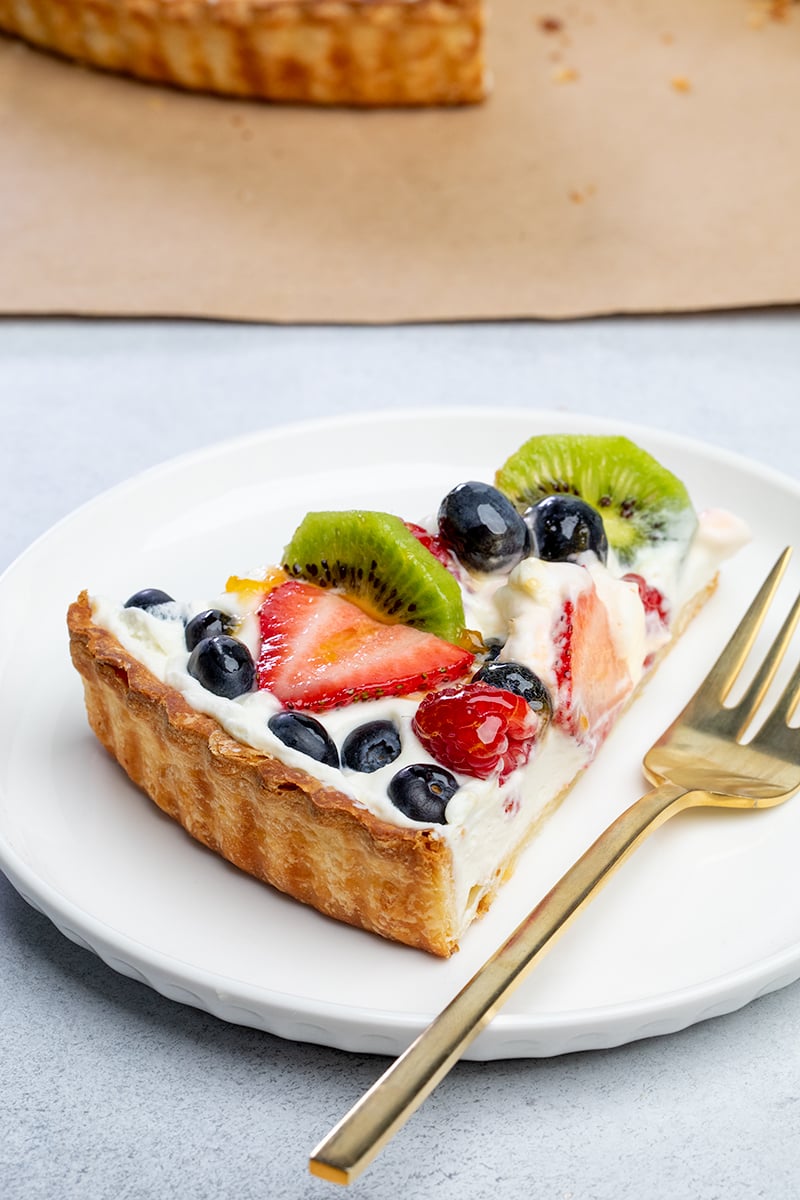
This gluten free fruit tart has a light, buttery pastry crust, filled with a no-cook cream filling, & topped with the season’s freshest fruit!

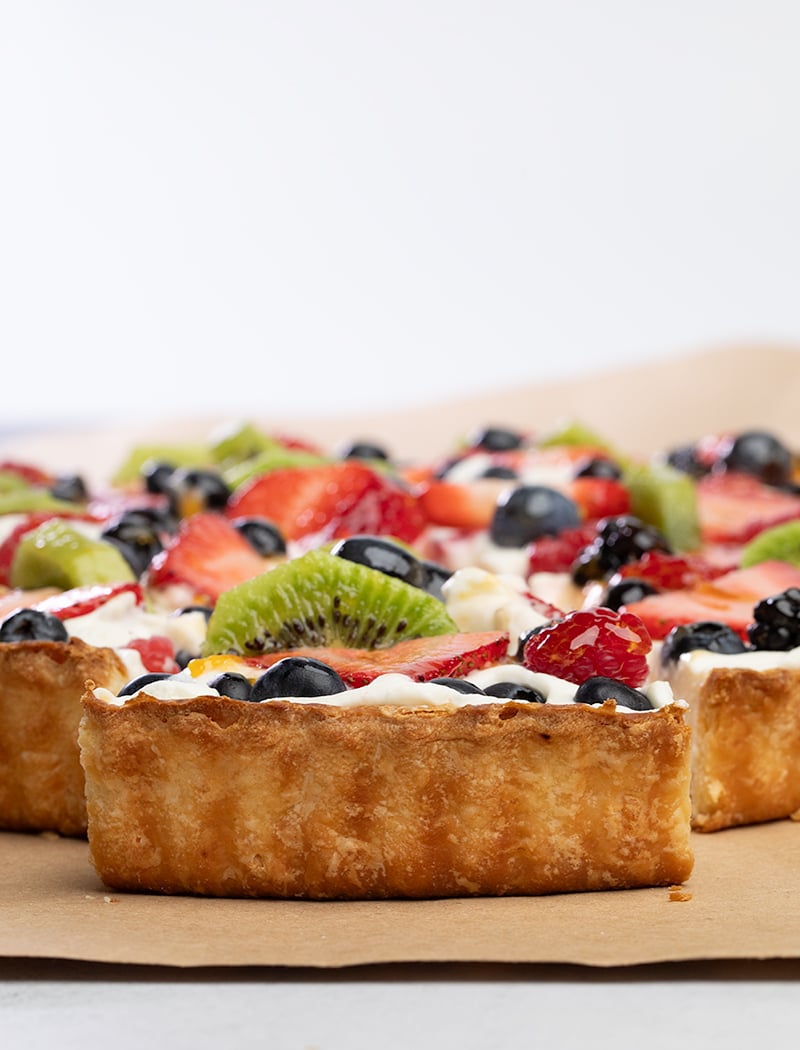
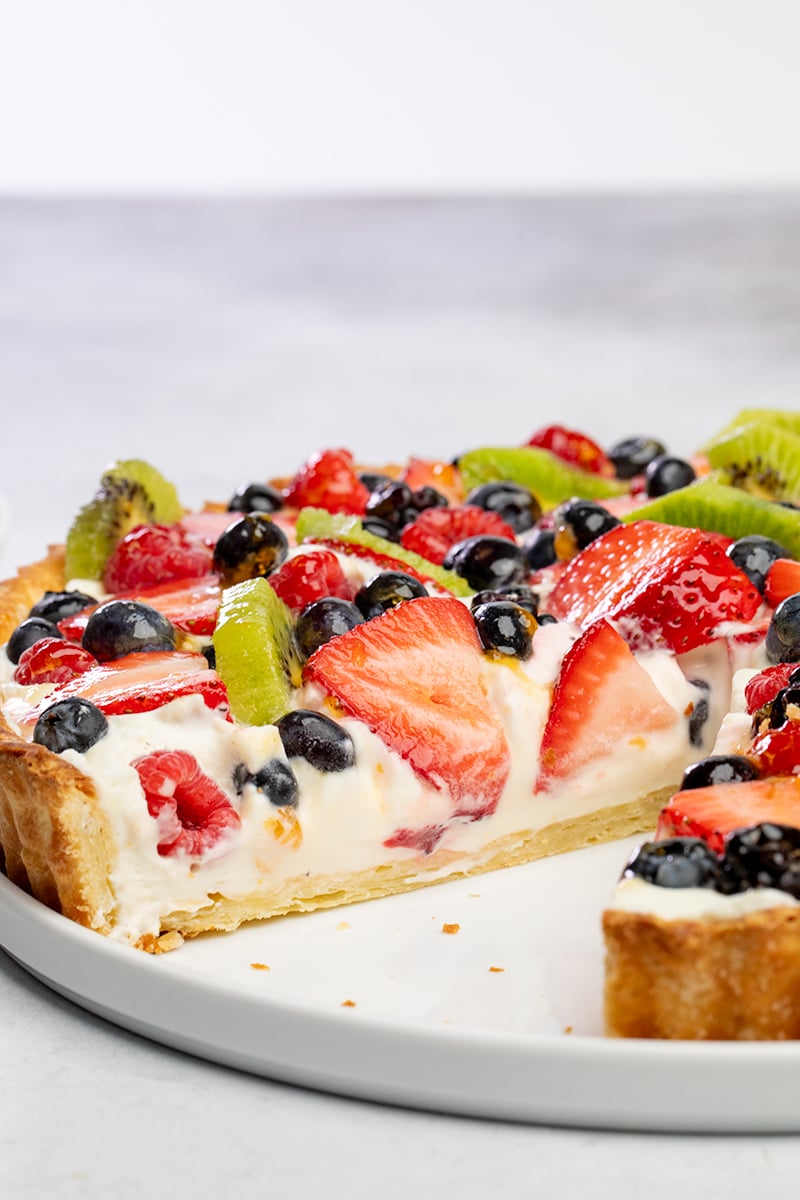
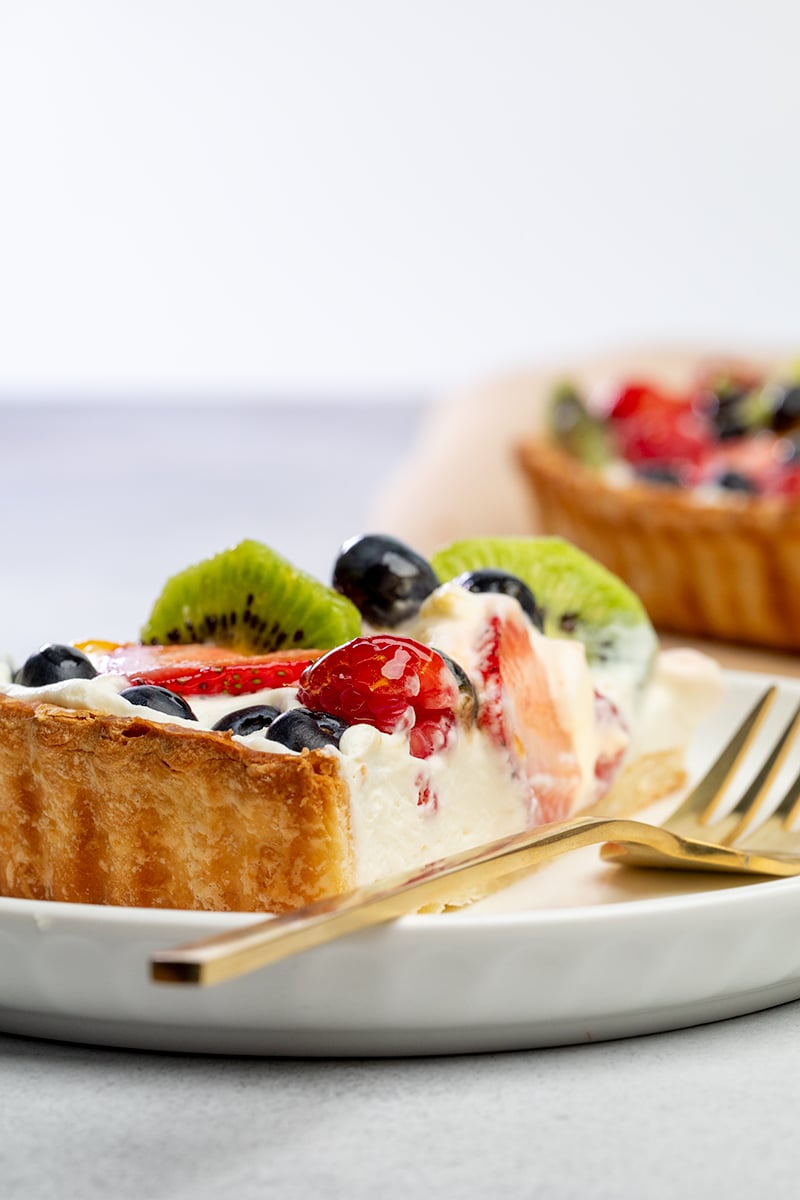
This gluten free fruit tart has a crisp, buttery base and it’s filled with a sweet, smooth filling made of cream cheese and whipped cream, and topped with all your favorite fruit. My family and I love to cover the creamy filling with sliced fragrant strawberries, raspberries, blueberries, just a few blackberries, and some tropical sweetness from a few slices of ripe kiwi. Forget the fork! Pick up that beautiful tart slice with your fingers, and enjoy!
Why you’ll love this gluten free fruit tart recipe
With a gluten free shortcrust pastry at the base and a mild cream filling, the fresh fruit really shines in this tart. Instead of having to make pastry cream like in our gluten free eclairs or custard, like in our gluten free trifle, which requires tempering eggs and cooking on the stovetop, this recipe makes it easy. Here’s what makes this one special:
- The pastry at the base of this fruit tart is flaky and buttery, and melts in your mouth
- The filling is creamy and sweet, with hints of cheesecake flavor from vanilla and cream cheese
- The no-cook filling is a mixture of sweetened and whipped cream cheese and fresh whipped cream
- You can make it in stages, so there’s no stress, starting with the tart crust days before you plan to fill the fruit tart
- The filling does really well if it’s made a couple hours ahead of time and allowed to set for cleaner slices, but you can also serve the tart right away if you’re in a hurry
- You get to use the season’s best fruit, and only your favorites. If you hate kiwi but still want some of that green color, add some sprigs of fresh mint!
The ingredients you’ll need
The ingredients you need for the tart shell are the ones in our gluten free shortcrust pastry recipe, which is repeated in the recipe card below. Details on those ingredients and that recipe are in that post. The other ingredients you’ll need to fill and top this gluten free fruit tart are:
- Confectioners’ sugar: we use this finely ground sugar with added cornstarch to help prevent clumping to add sweetness without adding any texture to the smooth filling
- Cream cheese: I am heavily biased in favor of Philadelphia brand cream cheese, but as long as you use full fat cream cheese in the block (not the tub), you’ll still get that cheesecakey taste and creamy tang
- Vanilla extract: To add some depth of flavor, use the good stuff. If you really want to add vanilla flavor, try using vanilla bean paste instead.
- Kosher salt: Salt brightens the flavors and balances the sweetness
- Heavy whipping cream: this is whipped into soft peaks and folded into the cream cheese mixture
- Berries: I like hulled and sliced strawberries, blueberries, blackberries, and raspberries for a variety of flavor, texture and color
- Kiwi: Peeled and sliced ripe kiwi adds pretty green color and some varied texture. If you don’t like kiwi, don’t use them! For added green color, try adding some sprigs of fresh mint
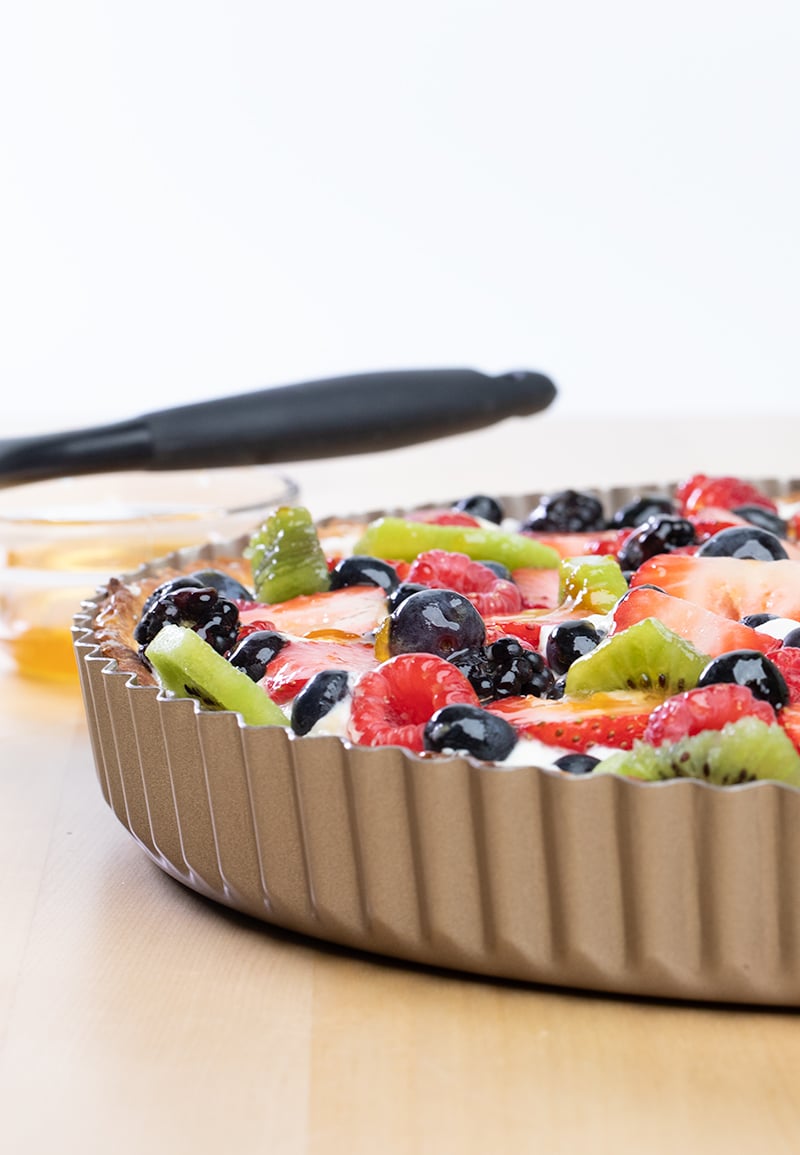
- Apricot or apple jelly: We use a pastry brush to brush on either mostly clear, mild-tasting jelly on the fruit once it’s on top of the tart filling to add shine and maintain moisture.
How to make a gluten free fruit tart
This recipe has 3 distinct parts: the pastry shell, the creamy filling, and the fruit topping. We cover all the details of how to make the pastry shell in our recipe for gluten free shortcrust pastry. Here’s how you make the filling and the fruit:
To make the filling
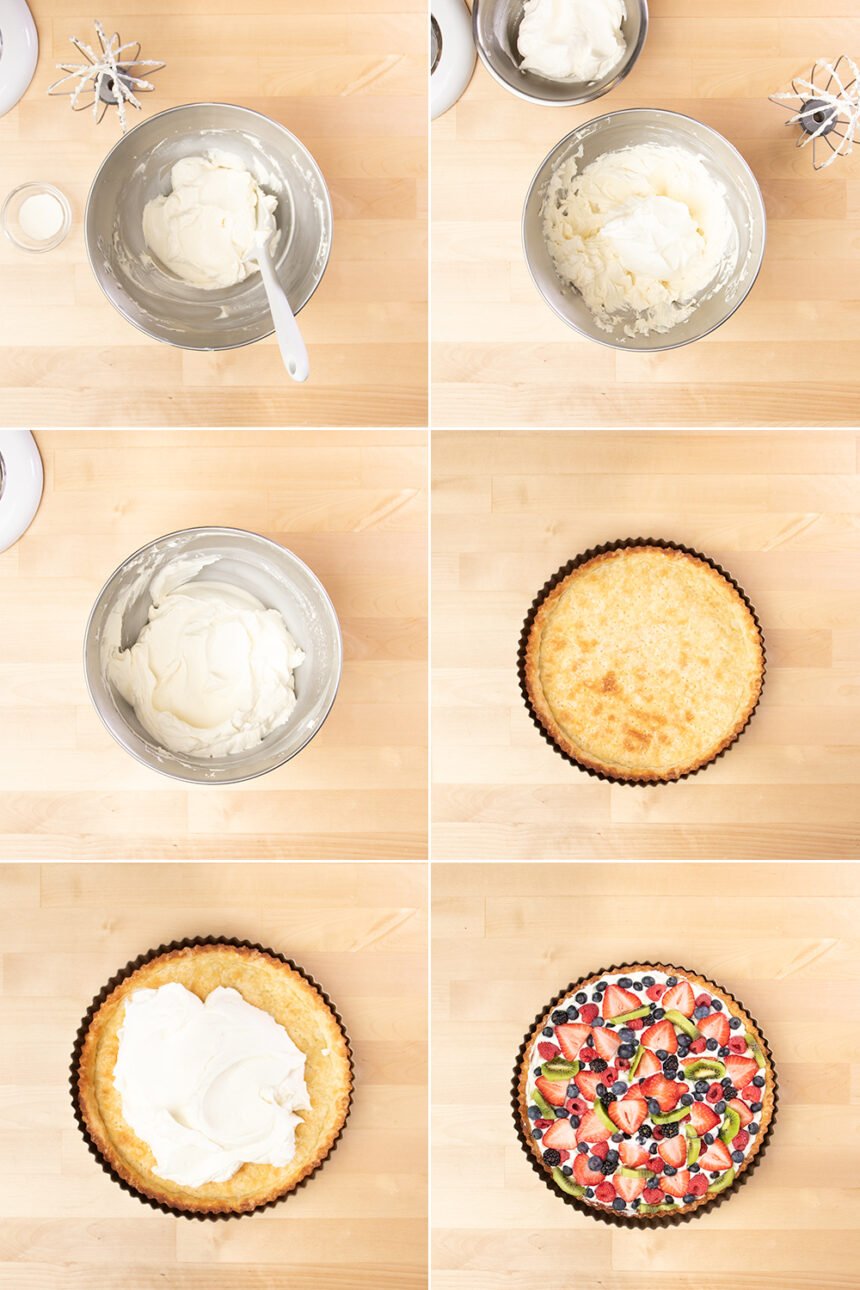
You’ll need some sort of electric mixer to make a smooth filling, but even the smallest, least powerful hand mixer will work just fine here. We’ll make the filling in either the bowl of a stand mixer fitted with the whisk attachment, or a large bowl with a hand mixer.
- Place all but about 2 tablespoons of 1 cup of heavy whipping cream in your mixing bowl, and whip on medium-high speed until soft peaks form. That should take about 5 minutes.
- If you go too far and end up with cream that looks bumpy or curdled, just whip in a tiny more cream and it will smooth things out.
- Add the confectioners’ sugar, and continue to beat until you have stiff, glossy peaks.
- Transfer the whipped cream to a separate, large bowl and place the whipped cream in the refrigerator to chill while you whip the cream cheese.
- In the same large mixing bowl, place an 8 ounce block of regular cream cheese (it must be at room temperature, or it won’t whip smooth), vanilla extract, a bit of salt and the reserved 2 tablespoons cream. Whip the cream cheese mixture on medium-high speed until light and fluffy (about 5 minutes).
- Now, combine the whipped cream from the refrigerator with the whipped cream cheese mixture in 2 parts: For the first part, whisk the whipped cream into the cream cheese. For the second part, fold it into the filling carefully until everything is uniformly combined.
To assemble the tart
This is the fun part, where you put the filling in your baked and cooled tart shell, and then decorate it with beautiful, ripe fruit.
- Scoop the filling onto the browned and cooled tart crust, and use an offset or silicone spatula to spread it into an even layer.
- Decorate the top with the fruit in whatever pattern you like. Sometimes, I add the fruit by variety, creating concentric circles starting on the outer edge and going all the way around, and then nesting the next fruit variety in another circle until I reach the center. Other times, I just randomly scatter fruit. Whatever looks beautiful to you.
- Use a pastry brush to paint the tops of the fruit with a light layer of clear apple or apricot jelly. If your jelly has been refrigerated, you’ll have to warm it briefly in the microwave in a microwave-safe bowl. Don’t heat it for more than a couple seconds, or it will boil!
- You can slice and serve the tart immediately. For a cleaner slice, place the assembled fruit tart in the refrigerator for about an hour to allow the filling to set before slicing and serving.
Gluten free fruit tart tips & tricks
Only choose fully ripe fruit
Since it can be hard to judge the ripeness of certain fruits, particularly at the start of that fruit’s season, I try to go by smell. Ripe strawberries will smell, well, like strawberries enough that you can tell if they’re ripe enough just by smelling near the carton in the store.
If your blueberries aren’t ripe enough, as long as they are blue in color, they will ripen a bit off the vine if kept at room temperature. Unfortunately, raspberries, blackberries, and strawberries won’t ripen off the vine, so choose carefully!
Eat with your hands!
Any time I serve a pie or tart that has a chilled filling and a pastry-style crust, like gluten free pumpkin pie or this fruit tart, no matter how tender the crust is, it can be hard to serve a properly chilled filling with a pastry shell that is easily cut with a fork. So I encourage everyone to pick up the slice of tart or pie—and eat it with their hands!
Make sure your crust is fully baked
Be sure to use some sort of pie weights (ceramic pie weights are great, but so are dried beans) on top of parchment paper when you first bake the crust, so it doesn’t puff up. Then bake your pastry crust until it’s lightly golden brown all over, with some darker brown spots, and dry to the touch. If the crust is not fully baked, it may get soggy after you add the cream cheese and whipped cream filling.
Gluten free fruit tart ingredients and substitution suggestions
Gluten free dairy free fruit tart
I’ve never found a dairy-free cream cheese alternative that I really love to replace that ingredient in the filling recipe. There are many alternatives available on the market today, including one from Miyoko’s Kitchen, and if you like the taste of one of those, I recommend trying it.
For the heavy whipping cream, you can use the drained cream from a chilled can of coconut milk, or try Silk brand dairy free heavy whipping cream alternative. For dairy free suggestions for the butter in the shortcrust pastry, please see that post (I like Miyoko’s Kitchen or Melt brand vegan butter).
Gluten free egg free fruit tart
The only egg in this recipe is the yolk used in the shortcrust pastry recipe. Please see the shortcrust pastry recipe post for full information, but I recommend trying a melted tablespoon of vegan butter in place of the egg yolk. You can just skip brushing the raw tart crust with the egg white before baking.
FAQs
The filling and topping in a gluten free fruit tart are often gluten free, as long as, if it’s made with traditional pastry cream, that is made with cornstarch, not flour. However, the shortcrust pastry base is made with wheat flour, unless it’s a gluten free shortcrust pastry or other gluten free pastry shell.
Did you make any ingredient substitutions, including possibly lowfat cream cheese or something other than a block of full-fat cream cheese? Other forms of cream cheese tend to have a lot more moisture, which they tend to leak.
Yes! The tart shell can be fully baked up to a month ahead of time, wrapped tightly, and stored in the freezer. Let it defrost at room temperature before filling it as the recipe instructs. If you’d like to fully assemble the tart, up to 2 hours ahead of time, complete the entire recipe and store the tart in the refrigerator. It will set and slice more cleanly, even. For longer storage of the filled tart, up to overnight, I recommend only adding the cream filling but not the fruit until about 2 hours or less before serving. Be sure to add the glaze to keep the fruit moist.
Yes! Instead of using a large, 11-inch single tart pan, you can use perforated tart molds or even just a standard 12-cup muffin tin. Just cut the rolled-out shortcrust pastry dough into rounds (for tart molds, use the bottom of the mold itself as a guide to cut out proper-sized rounds; for a muffin tin, cut out rounds about 3/4-inch larger than the diameter of the bottom of the wells of your muffin pan). Bake the shells until golden brown, and let them cool, then follow the recipe as written for each individual tartlet.
Choose ripe fruits that aren’t too wet when cut into bite-sized pieces like strawberries, or fruits like raspberries, blueberries and blackberries that are already bite-sized. Avoid fruits like melons that are too watery, or apples, peaches, or nectarines that are usually too hard in contrast to the creamy filling.
This recipe makes an 11-inch tart that I cut into 8 equal generous-sized slices. The approximate nutrition information in the recipe card is based on the approximate nutritional values in 1 of 8 equal servings. You can, of course, slice the tart into smaller wedges and get more servings out of the same tart.
Fresh Gluten Free Fruit Tart
This gluten free fruit tart has a light, buttery pastry crust, filled with a no-cook cream filling, & topped with the season’s freshest fruit!
Yield: 8 slices fruit tart
Prevent your screen from going dark
Ingredients
For the shortcrust pastry tart crust
- 1 (50 g (weighed out of shell)) egg at room temperature, separated
- ⅜ cup (3 fluid ounces) cold water plus more by the half-teaspoon as necessary, iced
- 1 ½ cups (210 g) all purpose gluten free flour blend my Better Than Cup4Cup blend is ideal, but please click thru for full information on appropriate flour blends, plus more for dusting
- ¾ teaspoon xanthan gum omit if your blend already contains it
- ½ cup (58 g) confectioners’ sugar sifted
- ½ teaspoon kosher salt
- 8 tablespoons (112 g) unsalted butter roughly chopped (into large chunks) and chilled
For the filling
- 1 cup (8 fluid ounces) heavy whipping cream chilled
- ½ cup (58 g) confectioners’ sugar sifted
- 8 ounces cream cheese at room temperature (must be block cream cheese, Philadelphia brand is best, & full fat)
- 1 teaspoon pure vanilla extract
- ⅛ teaspoon kosher salt
⠀For the fruit topping
- 8 ounces fresh strawberries hulled and sliced about 1/4-inch thick
- 2 fresh kiwis peeled and sliced by cross-section, about 1/4-inch thick
- 4 ounces fresh blueberries and/or blackberries
- 2 tablespoons apple or apricot jelly
Instructions
Make the shortcrust.
-
In a small bowl or measuring cup, whisk the egg yolk (reserve the white) and 3/8 cup cold water until well combined. Add some ice to the mixture to keep it cold, and set it aside.
-
In a large bowl, place the flour, xanthan gum, confectioners’ sugar, and salt, and whisk to combine well.
-
Add the chopped and chilled butter, and toss to coat the butter in the dry ingredients.
-
Press each floured chunk of butter between a floured thumb and forefinger to flatten.
-
Create a well in the center of the large bowl of dry ingredients, add the egg yolk and water mixture, taking care to filter out the ice.
-
Mix to combine. The dough will come together.
-
If there are any very crumbly bits, add more ice water by the half-teaspoon and mix to combine. Knead the dough together lightly just enough to press it into a disk.
-
Transfer the dough to a large piece of plastic wrap. Cover and press into a disk.
-
Refrigerate for at least 2 hours or up to overnight. You can chill the tightly-covered tart dough for up to a week, but it may be too difficult to roll out at first. Just allow it to rest at room temperature for about 10 minutes or until it rolls more easily (but make sure the dough stays cold).
-
Once the dough has chilled, preheat your oven to 375°F. Grease the bottom and sides of an 11-inch round tart pan with a removable bottom and set it aside.
-
Unwrap the dough, then turn it out onto a well-floured surface. Dust the surface with a bit more flour, and roll it out with a rolling pin into a 1/2-inch thick rectangle.
-
Fold the rectangle in half lengthwise, dust again lightly with flour, and roll the dough out again into a 1/2-inch thick rectangle.
-
Once more, fold the rectangle in half lengthwise, and then fold again widthwise to create a thick square.
-
Dust the square lightly with flour, and roll the dough out into a round that is about 13-inches in diameter (or about 2 inches larger in diameter than the tart pan you have chosen) and a bit less than 1/4-inch thick (not quite 1/8-inch).
-
Transfer the round of dough to the prepared tart pan, and press it gently into the bottom and the sides of the pan.
-
Using a knife or kitchen shears, trim the edges of the dough flush with the upper edge of the sides of the pan.
-
Pierce the bottom and sides of the tart crust with the tines of a fork about 25 times.
-
Brush the bottom surface of the crust generously with the egg white. Place the crust in the freezer for about 5 minutes or until it is beginning to feel firm.
-
Cover the bottom of the crust with parchment paper, and then dried beans or heat safe pie weights.
-
Place the tart crust in the center of the preheated oven and bake for 20 minutes at 375°F.
-
Reduce the oven temperature to 350°F, and remove the parchment and pie weights from the tart.
-
Return the tart crust to the oven and bake at 350°F for another 10 minutes or until dry to the touch and lightly golden brown in spots.
-
Remove the tart crust from the oven and allow it to cool fully before filling.
Make the filling.
-
Transfer 2 tablespoons of the cream to a small bowl and set it aside.
-
In the bowl of a stand mixer fitted with the whisk attachment or a large bowl with a handheld mixer, place the remaining cream and beat on medium-high speed until soft peaks form.
-
Add the confectioners’ sugar, and continue to beat until stiff, glossy peaks form. Transfer the whipped cream to a separate, medium-size bowl and place in the refrigerator to chill while you beat the cream cheese.
-
In the same mixing bowl, place the cream cheese, vanilla, salt and reserved 2 tablespoons cream.
-
With the paddle attachment if using a stand mixer, or the balloon whisks if using a handheld mixer, beat the cream cheese mixture on medium-high speed until smooth and light (about 5 minutes).
-
Remove the whipped cream from the refrigerator, add half of it to the cream cheese mixture, and whisk to combine.
-
Add the remaining whipped cream, and fold it into the filling carefully until combined.
Assemble the tart.
-
Place the filling on top of the cooled tart crust, and use an offset or silicone spatula to spread it into an even layer.
-
Decorate the top with the prepared fruit in whatever pattern you like. Sometimes, I like to place fruit by the type in concentric circles on top of the filling, and other times I place it randomly. As long as the colors of the fruit are varied, it will be beautiful.
-
Using a pastry brush, paint the tops of the fruit with a light layer of jelly. If the jelly has been refrigerated, you may need to place it in a small microwave-safe bowl and warm it for a few seconds (really, just seconds) in the microwave to loosen it first.
-
Slice and serve immediately, or, for a cleaner slice, place the assembled fruit tart in the refrigerator for about an hour to allow the filling to set.
Notes
I think this fruit tart tastes best with a flaky tart crust, like this recipe instructs. If you’d prefer, though, you can make it using a gluten free graham cracker crust, using a tart pan instead of a pie plate.
Nutrition information.
Nutrition information is an estimate only from online calculators, provided as a courtesy, and should not be relied on under any circumstances.
Nutrition
Calories: 449kcal | Carbohydrates: 50g | Protein: 5g | Fat: 33g | Saturated Fat: 20g | Polyunsaturated Fat: 2g | Monounsaturated Fat: 8g | Trans Fat: 0.5g | Cholesterol: 113mg | Sodium: 314mg | Potassium: 182mg | Fiber: 3g | Sugar: 9g | Vitamin A: 1228IU | Vitamin C: 36mg | Calcium: 68mg | Iron: 0.4mg