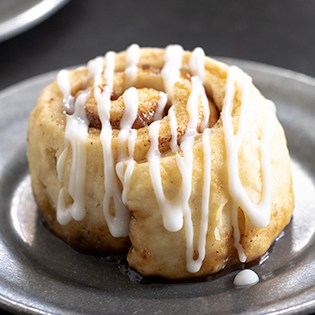
These sweet and tender gluten free cinnamon rolls are fluffy soft, the dough is easy to handle, and you’ll make the house smell like heaven!

These sweet, tender gluten free cinnamon rolls rise quickly and easily, and make the whole house smell amazing. Make weekend mornings special!
Why you’ll love this gluten free cinnamon rolls recipe
These tender, fluffy, rolls are just sweet enough for you to enjoy the delicious icing. The dough is enriched with an egg and butter, making it very tender, and easier to handle and shape. The rolls are so pillowy-soft that your family will never know they’re gluten free if you don’t tell them.
Warm, fluffy cinnamon rolls just like these were a family staple of mine growing up. They were homemade, but we didn’t make them ourselves.
I had an aunt from Sweden who made the best cinnamon rolls. They used to call them “Bia’s buns,” and everyone thought that was hysterical. I had no clue why, but I laughed like I was in on it (I got the “Bia part, because that was her name). I just wanted the rolls.
Making gluten free cinnamon rolls in advance
My Aunt Bia’s used to make her rolls in these round disposable tins and bake them partially. That way, they could be defrosted, finished in the oven and served fresh any time at all.
Here’s how you can make them in advance like Bia used to:
- Prepare and shape the raw rolls, let them rise, and then bake them at 300°F until puffed and very very pale golden, about 15 minutes. This is called parbaking them, so the yeast does its rise and they’re set.
- Remove the rolls from the oven, and let them cool completely to at room temperature.
- Cover the dish tightly with freezer-safe wrap, and freeze them.
- Defrost the dish at room temperature, and bake them at 350°F for about 10 minutes, or until the filling is bubbling and the rolls are just starting to brown a bit.
- Let them cool for about 10 minutes before icing or frosting the rolls, and serve warm.
How to make gluten free cinnamon rolls
These step by step photos for how to make this recipe are designed to make it easy for you to imagine exactly how to make these cinnamon rolls at home. For full instructions including exact quantities and a full printable recipe, be sure to scroll down to the recipe card.
Whisk dry ingredients, then add wet
This dough comes together so quickly and easily in a stand mixer with the paddle attachment. Begin by whisking together the dry ingredients (flours, yeast, salt, brown sugar, cream of tartar), and adding the wet ingredients (butter, milk, an egg, a splash of vinegar).
Beat the mixture well
Beat everything together well in your stand mixer. The mixture will clump at first, but just keep on beating until it starts to look a bit whipped and shaggy. To make the dough easier to handle, place it in a sealed container and refrigerate for 20 to 30 minutes.
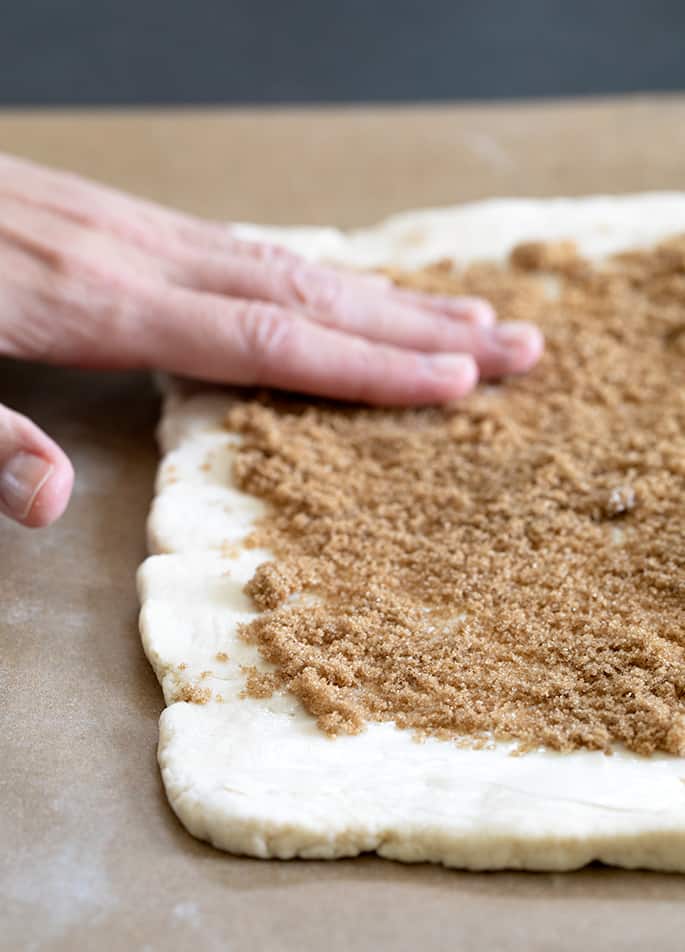
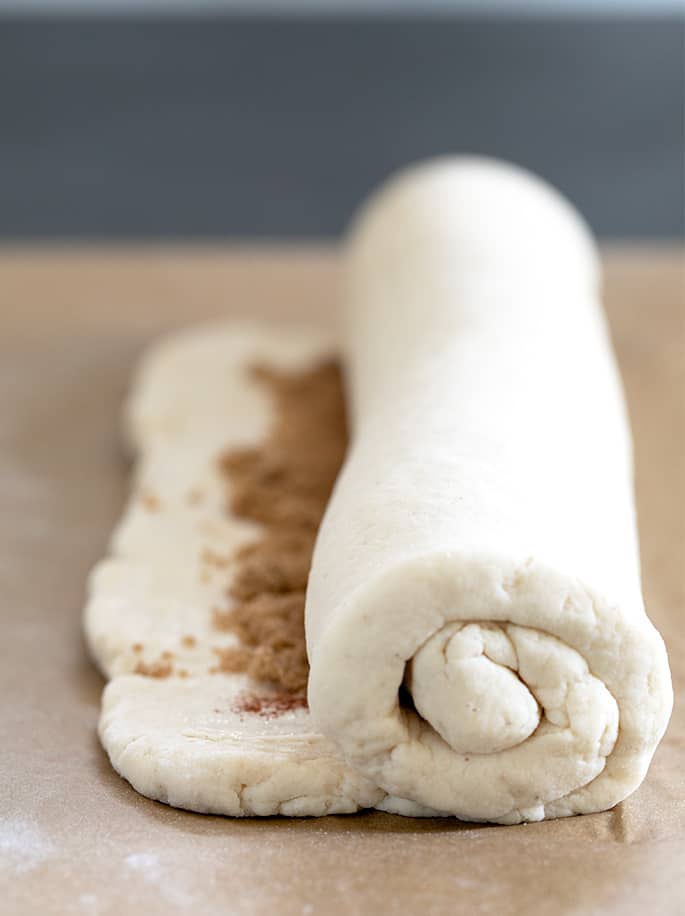
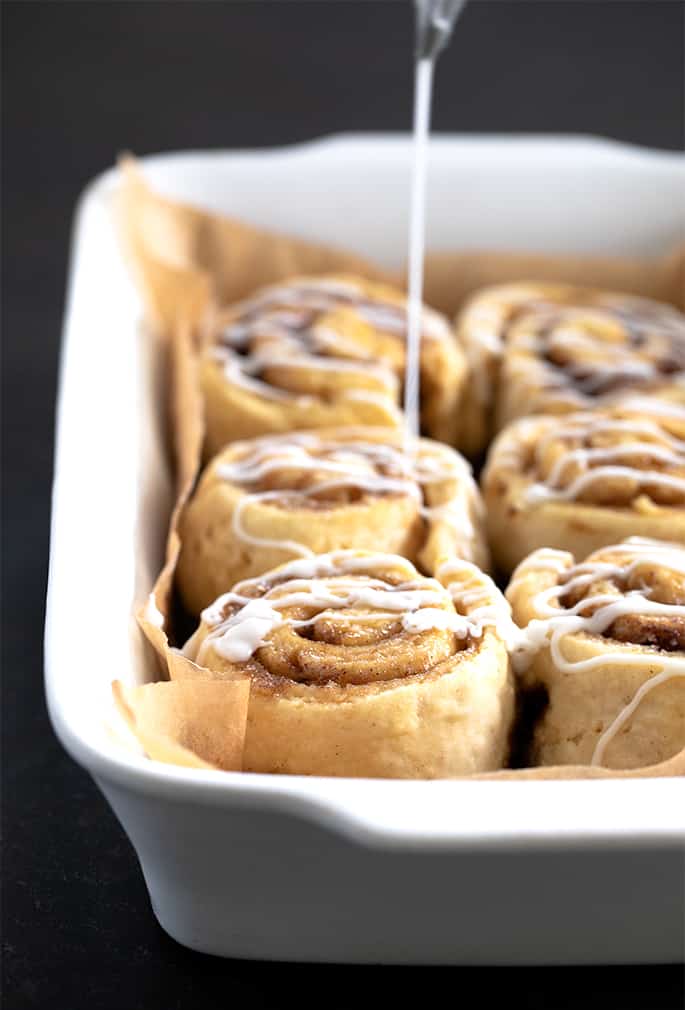
Roll, fill & shape the dough
To shape the dough, sprinkle it with a bit of flour to smooth it out, then roll it into a rectangle, sprinkling lightly with flour as needed. Spread some soft butter on top, then sprinkle brown sugar & cinnamon. Roll the dough into a coil, and slice with (of all things) dental floss if you have it! You’ll get the perfect rolls.
Let the rolls rise, then bake.
Place the raw rolls in a greased casserole dish, cover it, & let them rise. You only want them to swell to about 50% bigger than they started. You’ll know when the rolls are closer together than they were before. Bake at 350°F for about 25 minutes.
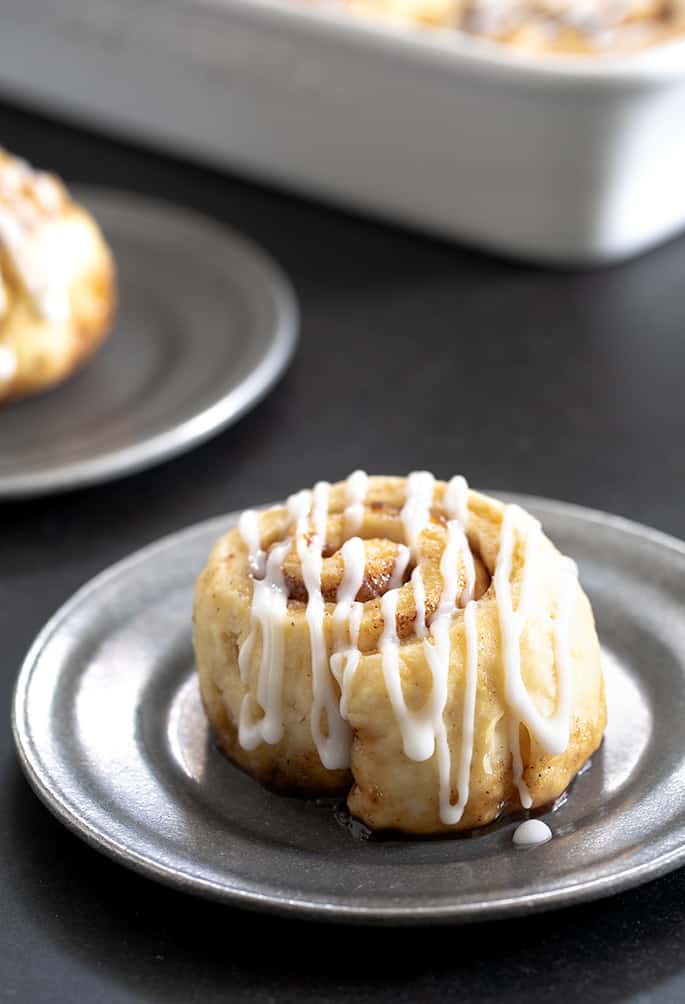
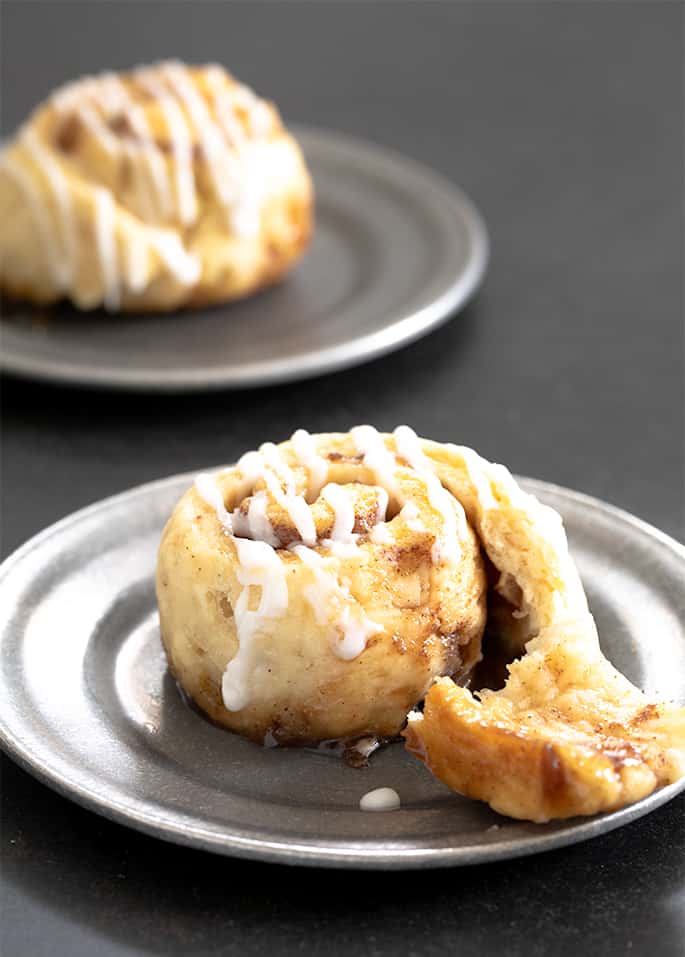
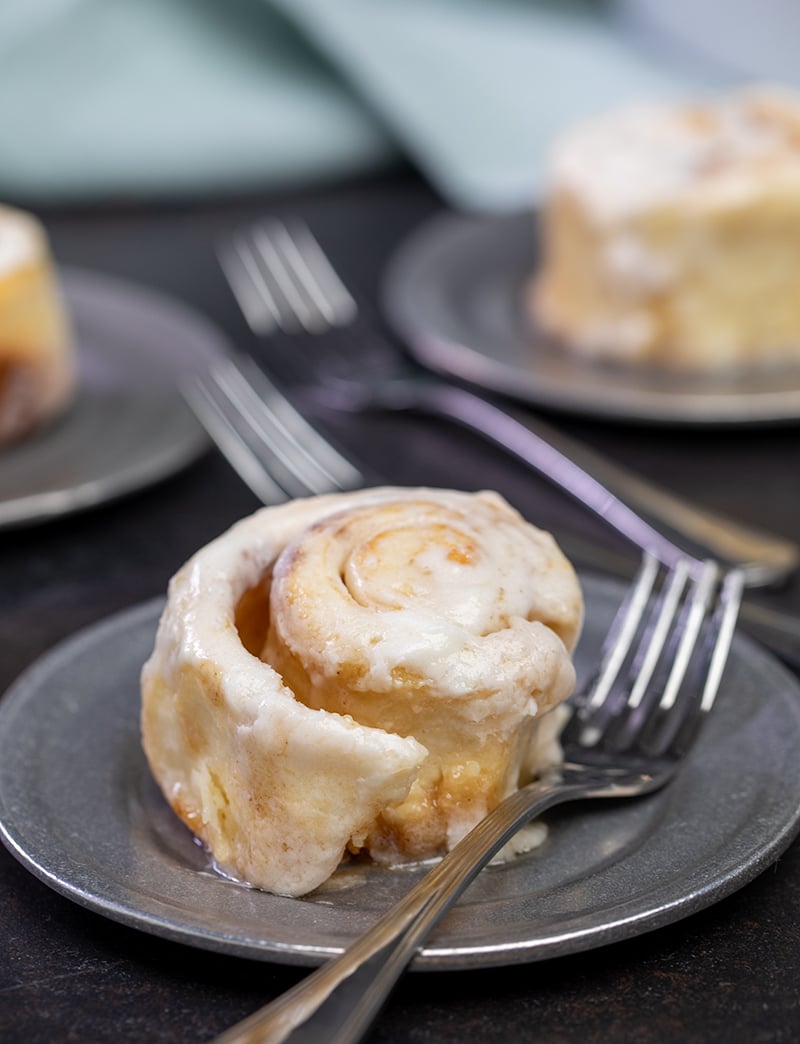
Add icing or frosting & serve warm!
Let the rolls cool out of the oven for only about 10 minutes before adding icing (a simple milk and sugar mixture) or frosting (a thin buttercream icing). You want the frosting or icing to melt a bit when you spread it on. Let it set briefly, and serve warm! The frosting or icing will also keep the rolls fresh for longer.
Tips for making the best gluten free cinnamon rolls
Begin with cold dough
This dough is easiest to work with when it’s cold. If you can, place the raw dough in a tightly sealed container (plastic is fine) and refrigerate it for at least 30 minutes before working with it.
When the dough is cold, you’ll be much less likely to incorporate a lot of extra flour into it during shaping. If you do add too much flour during shaping, you will lower the hydration ratio of your dough and the yeast won’t be able to be active.
Practice patience
If you only take away one piece of advice about baking with yeast, it should be the importance of patience. Of course, you don’t want your rolls to overproof (or over-rise), as they’ll break apart even before they bake in the oven. But yeast takes time to grow.
Baking with yeast is also very environment-dependent. If the environment in your kitchen is cooler or the air is very dry, the yeast will continue to grow, just more slowly.
Maintain the right temperature
Extremely high temperatures and extremely low temperatures can kill the yeast. Once the dough is about 50% larger than when it started rising, it’s considered fully risen.
This type of gluten free yeast dough won’t usually double in size during the rising phase. Before it reaches a true doubling, it will start to get pock-marked and overly soft.
The bulk rise, which is the only necessary rise for this dough, should take about 45 minutes. I typically turn on my oven to 300°F and set the covered and shaped dough on top of the range. But if it takes longer than an hour, let it go longer.
Overproofing happens when the dough has proofed too much, not when it’s been left to rise for “too long.” There is no “too long” for proofing unless the dough has over-proofed. But if you don’t let the dough rise for long enough before baking, it will be dense after baking.

Roll your cinnamon roll dough 1/2-inch thick
Be sure not to roll your cinnamon roll dough too thin, or the dough will break as you roll the filling inside. Too thick, and you won’t be able to fit in enough filling—or get much of a pretty swirl!
Use a dental floss or a very sharp knife for slicing the rolls
To slice the roll cleanly from the coiled log, use a piece of unwaxed, unflavored dental floss. You can also use a a very sharp knife, and saw gently, rather than cutting in one motion, or you’ll compress or tear the dough.

How to store gluten free cinnamon rolls
Storing baked gf cinnamon rolls
Once your rolls are baked, before you add the glaze, you can cool them completely and freeze them in a single layer. Just wrap them first very tightly in freezer-safe wrap, and they warm up perfectly.
Reheating gluten free sweet rolls
If your rolls aren’t just out of the oven, we can still make them taste like they are! Try letting them defrost at room temperature until they’re no longer frozen in the center, then sprinkle them with some water and refresh them in a 275°F oven or toaster oven.

Ingredients & substitution suggestions
How to replace the dairy
You can try replacing the milk powder with powdered coconut milk. The butter in both the rolls and the filling can be replaced with a vegan butter that softens nicely at room temperature, like Melt brand or Miyoko’s Kitchen brand. For milk, use your favorite unsweetened nondairy milk, but make sure it has some fat, like almond milk.
How to replace the egg
Since there is only 1 egg in this recipe, I expect that it would work well with a “chia egg” substitute (1 tablespoon ground white chia seeds mixed with 1 tablespoon lukewarm water and allowed to gel).
How to replace apple cider vinegar &/or cream of tartar
The cider vinegar and the baking soda combine during baking to give the rolls a bit more lift along with the yeast. In place of apple cider vinegar, you can use freshly squeezed lemon juice. In place of cream of tartar, try 1 additional teaspoon of lemon juice and reduce the milk by 1 teaspoon.
Choosing a gluten free flour blend
You really must use one of my recommended gluten free flour blends for this recipe. All of my gluten free recipes are designed to be made with one of my recommended blends, but yeast bread in particular is even more sensitive to flour substitutions.
I highly recommend using Better Batter (or my mock Better Batter) gluten free flour blend in yeast bread applications like this. I have successfully made this recipe with both Cup4Cup and my Better Than Cup4Cup blends, though, and the rolls are fluffier but the recipe still works.
Make sure you’re using milk powder or buttermilk powder and not liquid buttermilk, or your dough will be too sticky to handle.
FAQs
No! Cinnamon rolls that aren’t made specifically to be gluten free aren’t safe on a gluten free diet. You need to use this recipe, or another one like it, made with reliably gluten free ingredients.
Patience is the #1 virtue in yeast bread baking! Overproofing is a matter of not rising enough, not rising for too long, so don’t fear overproofing. Just cover your raw dough properly to avoid its drying out, measure your water by weight so you don’t undermeasure it, and wait!
If you didn’t make any changes to the recipe as written, used one of my recommended gluten free flour blends, and measured by weight, you likely either added too much additional flour during shaping, or didn’t let your rolls rise long enough before baking.
Here are some questions to ask yourself as you troubleshoot:
Did you use Better Batter classic blend GF flour, and measure by weight? Not all gf flour blends are created equal, particularly for yeast applications.
Did you use buttermilk or milk powder, and not liquid buttermilk? That is a relatively common error and will lead to overhydrated dough.
Dry cinnamon rolls were maybe overbaked, were dense because you added too much flour during shaping, or absorbed too much moisture because you used a poorly balanced flour blend.
Yes! To use active dry yeast, you’ll need 25% more yeast (here, that would be a total of a scant 8 grams of active dry yeast), and dissolve the yeast first in some of the milk before adding it to the mixture.
Gluten Free Cinnamon Rolls
These sweet and tender gluten free cinnamon rolls are fluffy soft, the dough is easy to handle, and you’ll make the house smell like heaven!
Yield: 12 rolls
Prevent your screen from going dark
Ingredients
For the rolls
- 3 cups (420 g) all purpose gluten free flour blend (I highly recommend Better Batter; please click thru for full info on appropriate blends), plus more for sprinkling
- 2 teaspoons xanthan gum omit if your blend already contains it
- ¼ cup (36) tapioca starch/flour
- ½ cup (43 g) dry milk powder or buttermilk powder; make sure it’s powder, not liquid!
- 2 teaspoons (6 g) instant yeast
- ¼ teaspoon cream of tartar
- ¼ teaspoon baking soda
- 2 tablespoons (26 g) packed light brown sugar
- 1 teaspoon kosher salt
- 1 teaspoon apple cider vinegar
- 4 tablespoons (56 g) unsalted butter at room temperature
- 1 (50 g (weighed out of shell)) egg at room temperature, beaten
- 1 ¼ cups (10 ounces) warm milk about 95°F (plus a bit more, only as necessary)
For the filling
- 4 tablespoons (56 g) unsalted butter at room temperature
- ¾ cup (164 g) packed light brown sugar
- 1 teaspoon ground cinnamon
For an optional glaze
- 1 cup (115 g) confectioners’ sugar sifted
- 1 tablespoon milk any kind, plus more by the 1/4 teaspoonful
For an optional frosting
- 6 tablespoons (84 g) unsalted butter at room temperature
- 2 cups (230 g) confectioners’ sugar sifted
- 3 tablespoons heavy whipping cream at room temperature, plus more as necessary
Instructions
Make the dough.
-
In the bowl of a stand mixer fitted with the paddle attachment, place the flour, xanthan gum, tapioca starch, milk powder, yeast, cream of tartar, baking soda and sugar in the bowl of your stand mixer. Whisk to combine well with a separate, handheld whisk.
-
Add the salt, and whisk with a separate whisk again to combine well.
-
Add the cider vinegar, butter, and egg, and milk, and mix to combine well.
-
Turn the mixer up to high and let it work for about 3 minutes. If necessary to help the mixture become smooth and cohesive, add more milk by the drop, only as essential to bring the dough together.
-
The dough will be moist but continue to mix until the dough starts to pull away from the sides of the bowl in spots.
-
To make the dough easier to handle, transfer it to a sealed container and refrigerate it for 30 minutes.
Roll out the dough.
-
Turn the chilled dough out onto a flat, lightly floured surface. Sprinkle it with some extra flour and knead it gently until it’s somewhat smoother.
-
Divide the dough in half, and place one half under a tea towel to prevent it from drying out.
-
Using a rolling pin and sprinkling lightly with flour as necessary to prevent sticking, roll the remaining half of dough into a rectangular shape about 1/2-inch thick, and about 9 inches wide x 12-inches long.
Add the filling and shape the dough, one piece at a time.
-
Beginning with the first piece of dough and using an offset spatula or spoon, spread half of the softened butter all around the rectangle, leaving 1-inch border clean all around.
-
Sprinkle with half of the brown sugar evenly on top of the butter and pat the brown sugar down lightly with your fingers to help it stick to the butter. Sprinkle the cinnamon evenly on top of the sugar.
-
Starting at a short side, roll the dough tightly into a coil. Using a piece of unwaxed dental floss or thread or a very sharp knife, cut rolls in cross-section each about 2-inches wide.
-
Place the rolls in the prepared baking pan, about 1-inch apart. Apply even pressure to the top of each roll with your fingers to compress the coil about 1/3 of the way down.
-
Repeat the process with the other half of the dough, and the other half of the softened butter and brown sugar.
Let the rolls rise.
-
Cover the pan with lightly oiled plastic wrap and set in a warm, draft-free location to rise until about 150% its original size. It should take about 45 minutes, but may take longer in a cold, dry environment.
Bake the rolls.
-
When the dough is nearing the end of its rise, preheat your oven to 350°F. Remove the plastic wrap and place the pan in the center of the preheated oven.
-
Bake for about 20 minutes or until the cinnamon rolls are risen, just beginning to brown on top and cooked all the way through. Remove from the oven and let the rolls cool for about 10 minutes.
-
If you plan to add the glaze (or frosting), make it right when the rolls come out of the oven so you can add it when they’re still warm.
Make the (optional) glaze.
-
In a small bowl, place the confectioners’ sugar and milk. Mix well, until a thick paste forms.
-
Add more milk by the 1/4-teaspoon, mixing to combine well, until the glaze falls off the spoon slowly, in a thick but pourable glaze.
-
Drizzle the glaze on top of the warm rolls and allow to set briefly before serving.
Make the (optional) frosting.
-
In a medium-size bowl, place the butter and confectioners’ sugar, and use a handheld mixer to beat first on low speed until well-combined.
-
Increase the mixer speed to medium. The mixture will first clump, and then smooth out.
-
With the mixer running, add 2 tablespoons of cream to thin the frosting so it’s easily spreadable. Add more cream if you’d like a thinner, more spreadable frosting.
-
Spread the frosting generously on top of the warm rolls and allow to set briefly before serving.
Notes
I have found that making this recipe with milk, instead of water, makes for a richer cinnamon roll and a dough that is easier to handle. Whole milk is best, but 2% works well, too. Please avoid using skim milk, as it behaves much like water in baking. I’ve also replaced 1/4 cup of the all purpose gluten free flour blend with additional tapioca starch/flour, which makes the dough much stretchier and easier to handle.
Nutritional information.
Nutrition information is per cinnamon roll assuming the recipe is divided into 12 rolls. It is calculated excluding any frosting or glaze using online nutrition calculators. It is inherently unreliable.
Nutrition
Serving: 1roll | Calories: 183kcal | Carbohydrates: 50g | Protein: 5g | Fat: 9g | Saturated Fat: 5g | Polyunsaturated Fat: 0.4g | Monounsaturated Fat: 2g | Trans Fat: 0.3g | Cholesterol: 38mg | Sodium: 298mg | Potassium: 188mg | Fiber: 2g | Sugar: 19g | Vitamin A: 404IU | Vitamin C: 0.4mg | Calcium: 114mg | Iron: 0.3mg
Thanks for stopping by!
Hi, I’m Nicole. I create gluten free recipes that really work and taste as good as you remember. No more making separate meals when someone is GF, or buying packaged foods that aren’t good enough to justify the price. At Gluten Free on a Shoestring, “good, for gluten free” just isn’t good enough! Come visit my bio!