Combining my Hazelnuts (Cobnuts) and Berries into a Dessert
Over the past couple months I was lucky enough to find quite a few wild blackberries, black raspberries, and hazelnuts (a.k.a. filberts or cobnuts) growing nearby here in Bath, Somerset, United Kingdom — along walking trails, bike trails, and other public areas. I have written about each component recently including:
Now, it is time to put the individual core components to use in a simple-to-make dessert recipe!
Recipe, Directions, Ingredients
Although I have written and published formal gluten-free dessert recipe cookbooks, where each recipe includes the exact ingredient measurements used, I rarely go to such lengths when baking for myself — instead, I simply measure “by sight”. This recipe for a simple, natural, blackberry-hazelnut crumble is one where measuring the ingredients is rather overkill (in my opinion) since much of it can be done to “personal preference” or “to taste”. Some people will like more sugar added (I tend to prefer more tartness in this dish than may be average) and others may not like the taste of cinnamon, so simply go with your gut-feel on alterations and it will probably be fine.
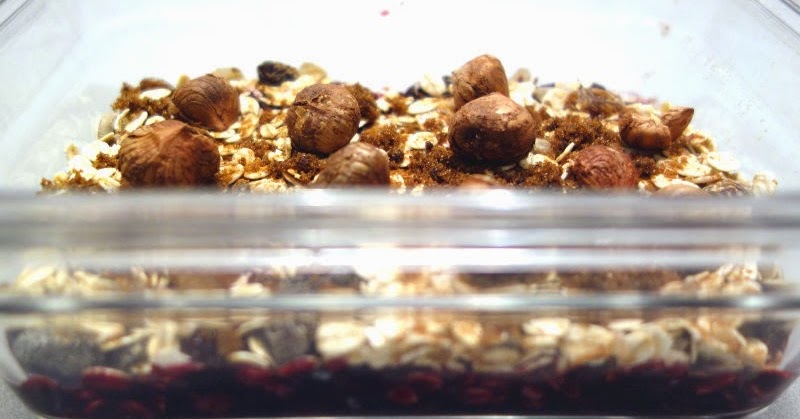
| Gluten-Free Recipe Ingredients – Berries layer, GF Oats, Filberts, Cinnamon |
As shown in the first picture (above), I have simply used a rectangular Pyrex (oven safe glass) dish to layer the following ingredients into:
- some of my pre-cooked blackberries (or black raspberries) that I added a bit of lemon juice (or a few drops of lemon oil), a small bit of vanilla, and some muscovado sugar (dark brown sugar) to
- some gluten-free oats or gluten-free oat muesli (I used Nairn’s Gluten-Free Oat Muesli, which I have actually been OK with and which I plan to review later)
- a sprinkle of ground cinnamon
- a few of my toasted hazelnuts
- a slight sprinkling of additional muscovado sugar on top
- read next paragraphs for additional thoughts on altering this a bit…
Then, I just tossed this all into the oven at around 375-400° F (185-200 degrees C) for 15-20 minutes until I could see the berries bubbling a bit in the bottom layer. I was really just going for warming the ingredients well and caramelizing some of the sugar in the berry layer. I waited a few minutes after removing the dish from the oven and then served it.
My recipe-notes-to-self: the muscovado sugar on top did not melt as I wanted it to — and, looking back, I would change something with the recipe: I would use a bit of butter into which I would melt the brown sugar and add a bit of vanilla, and then drizzle that over the top layer to help the surface of the dish look nicer and crisp up and caramelize a bit (but that’d also prevent the recipe from remaining dairy-free as it is now; then again, serving it with vanilla ice cream would be lovely too if I was to stray from dairy-free!)
I was in a bit of a hurry when I made it, and though it tasted good (thanks to delicious ingredients) it would have been better with a more even, caramelized top. Thankfully, I have more of thee ingredients to put to use!
 |
| The finished product: baked, warm, and ready for eating! |
Enjoy.
Continue to read this Gluten-Free Blog for all sorts of gluten-free recipes, product-reviews, and related information. In addition, visit my Gluten-Free Recipes Site where many of the recipes I have featured on this blog are available.


